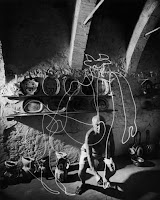
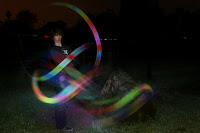
The Latin translation for "photography" is "painting with light." These types of Time Exposures take this to a more literal meaning. To the right is a photograph of Pablo Picasso, taken in France by Gjon Mili in 1949. The photograph was one of the first of its kind, utilizing the effects of having a lengthened shutter speed. In the photograph that I took to the left, the same skills are put to use. How does one go about creating a photograph such as these? For one, with a lot of patience and willingness to try again and again, but overall it is a fairly simple, and fun, task. The first thing you will need is a tripod, this is crucial for keeping the image from blurring or looking shaky with a shutter speed as long as will be necessary. The next thing is a light source which can be anything depending on the results you desire. For example, a lighter, a flashlight, or even the light from your cell phone will do the trick. Looking at my photograph, it is obvious that none of the above examples were used. We used the "Flashlight" application on my iPhone and set it to the colored strobe light, which is how we ended up with the rainbow light traces. Get creative and try anything that comes to mind! The next thing you will need is a camera with an adjustable shutter speed. You can either set it to the desired time (i.e. 20 seconds) or to "BULB" which allows the shutter to stay open for as long as you keep your finger on the shutter release button. Another important rule to creating these types of time exposures is it must be dark where the photo is being taken, otherwise it will turn out white from overexposure. Now you may be looking at these examples I provided and wondering how the men in the photos are so visible. The trick is to pop a flash, either at the beginning or the end of the exposure, burning a still image onto the photo, but still allowing for light traces to be added on top. Combining each of these skills is important, but your best photos will come after experimenting yourself and with practice. In my opinion, these are some of the most fun types of photos you can take because they combine the art of photography with the art of painting, the opportunities are endless!
Have questions? Email me at photo.critique.made.unique@gmail.com and I will be happy to answer them! :)